Guide - Written by Ahmer Tahir
How To Make Teamspeak 3 Server On Linux
Last updated - - 2 years ago
Introduction
In this guide, you will learn how to make a teamspeak 3 server on linux. For this guide, you should know linux basics like SSH or No SSH Login for your VPS or any Linux Server. In short, you should know how to access your server where you are going to make it.
I’m going to use the Debian 11 Server. You can use any linux version. Process is the same. The main difference will be Sudo or Non Sudo. Debian 11 has default Root User but it is not included in the sudo group itself. I’m going to keep it that way and simply install without being a sudo user.
Where I live, Discord always has problems connecting to the server. That's why I created teamspeak 3 which is also available for everyone in my country. TeamSpeak is a proprietary voice-over-Internet Protocol application for audio communication between users on a chat channel, much like a telephone conference call. Users typically use headphones with a microphone.
Prerequisites
Here is some information you should know before creating Teamspeak 3 Server:
- Teamspeak 3 Default server has 32 users join limit.
- Buy License if you want to increase your user slots.
- Only Buy License, by default License comes with Hosting which can be expensive.
- Create a new regular user in linux to securely save our files and admin account.
- You will have to open ports to make it work publicly.
- Secure Token that you will get after Running the service.
- First user to join the server with Token, will be server admin.
- If you join server without Login Into Teamspeak 3 account, token will be temporary
- If you reinstall your windows or OS, you will lose your admin power. Make sure to Login Teamspeak first then join the server.
- You should know about nano and copy paste commands in linux.
Steps you have to follow:
Here are some simple steps that you have to follow to be able to create & use TS3 Server:
- Update Debian 11 Server
- Create User and Set Password
- Download Teamspeak 3 Server Files
- Unzip Files & Create License File
- Run Server As Service
- Start Teamspeak Server & Service
- Retrieve The Privilege Key
- Configure Firewall
- Connect To Teamspeak Server
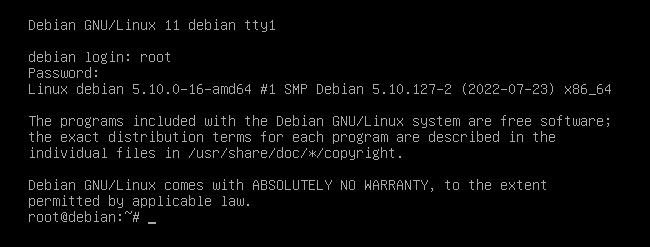
Step 1 — Install Base Package
After you log into your VPS or Server. You have to update it. In my condition I'm using Debian 11 Server with root user, i’ll use the following command without sudo.
$ apt-get update && apt-get upgrade
Step 2 — Create User and Set Password
Now, after updating the server, we have to create a user (teamspeak) where we can save our server files. We will also set a password for this server to secure it from any unauthorized access.
To create a user teamspeak with home directory, type this following command:
$ useradd -m teamspeak
Now set the best password to secure it using the command:
$ passwd teamspeak
Now you have to change the directory to the new user’s home directory. Type the following command to change the directory. If it shows any error, simply restart your system.
$ cd /home/teamspeak
Step 3 — Download Teamspeak Server Files
Now we have to download Teamspeak 3 Server files for Linux. As you can see in the image below, Teamspeak 3 License has the 3.13.7 version available. You can go to Teamspeak Server and check the version.
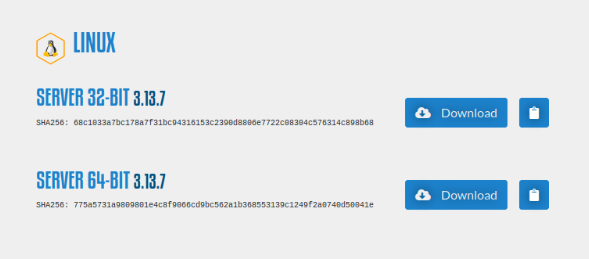
Using the command given below, you will download Teamspeak 3.13.7 version files. Change this number if you want to download different versions. You can copy your version complete link by clicking the clipboard next to Download Button in the image above.
$ wget https://files.teamspeak-services.com/releases/server/3.13.7/teamspeak3-server_linux_amd64-3.13.7.tar.bz2
Step 4 — Unzip Files and Create License File
This is one of the most important step that you have to do. First Make sure you are in /home/teamspeakdirectory then run the following command to unzip files (Change Version to your’s).
$ tar xvf teamspeak3-server_linux_amd64-3.13.7.tar.bz2
Now go to the directory that was created after unzipping the file. Directory name is the same for all versions.
$ cd teamspeak3-server_linux_amd64
Now you have to create the license file and make sure you are in /home/teamspeak/teamspeak3-server_linux_amd64 folder.
$ touch .ts3server_license_accepted
Step 5 — Run Server As Service
Now we are going to run the server as a service. What does it do? When you run a shell script, your terminal or ssh session should keep running. If you close your ssh or terminal then your shell script will stop.
In our case, the Teamspeak server runs with a shell script and we want to run it in the background without worrying about ssh sessions. This is where Service comes in. You create a symbolic link towards your shell file, after server bootup, your Teamspeak server will automatically start.
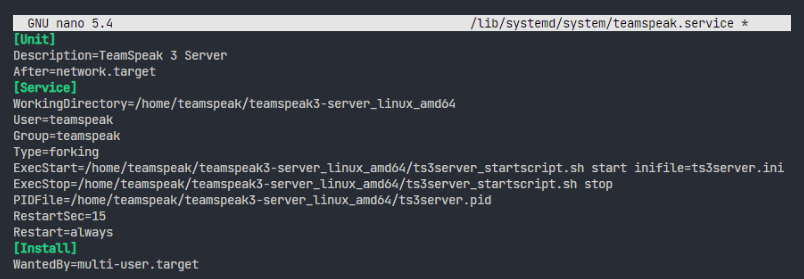
To create the file, run this following command:
$ nano /lib/systemd/system/teamspeak.service
It should give you bank space. Now you have to paste the lines given below.
[Unit]
Description=TeamSpeak 3 Server
After=network.target
[Service]
WorkingDirectory=/home/teamspeak/teamspeak3-server_linux_amd64
User=teamspeak
Group=teamspeak
Type=forking
ExecStart=/home/teamspeak/teamspeak3-server_linux_amd64/ts3server_startscript.sh start inifile=ts3server.ini
ExecStop=/home/teamspeak/teamspeak3-server_linux_amd64/ts3server_startscript.sh stop
PIDFile=/home/teamspeak/teamspeak3-server_linux_amd64/ts3server.pid
RestartSec=15
Restart=always
[Install]
WantedBy=multi-user.target
It should look like this.
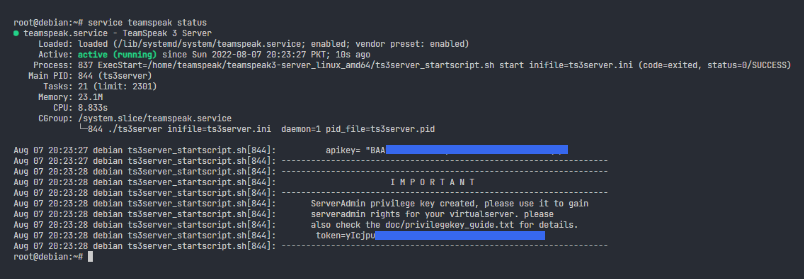
Step 6 — Start Teamspeak Server & Service
To simply start the server, copy and paste the the following commands:
Enable Teamspeak Service.
$ systemctl enable teamspeak.service
Start Teamspeak Service
$ systemctl start teamspeak.service
Check Status
$ service teamspeak status
If everything is ok, then status should look like this. It will also show you your privilege key to access your teamspeak server for the first time and become an admin otherwise go to Step 7 to check for the privilege key.
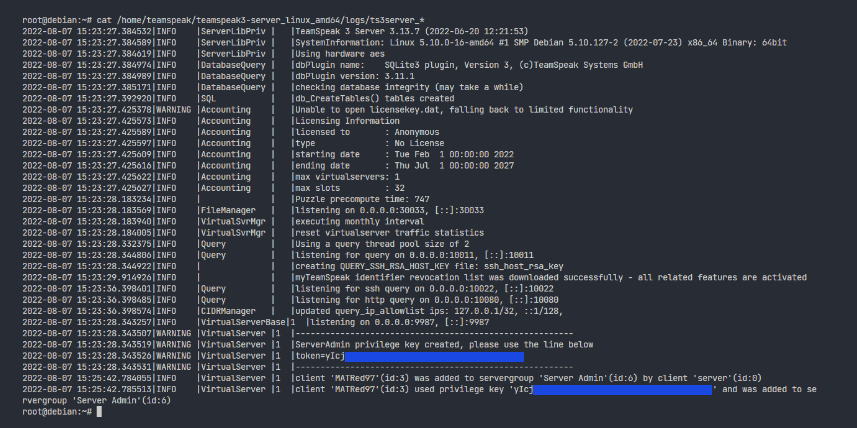
Step 7 — Retrieve the Privilege Key
Now we have to fetch our privilege key. You have to use it to claim ownership of the server and become an admin. In the image below you can see three things:
- Your Server Ports that you have to open
- Privilege Key aka Token
- User who used it for claiming ownership
If you have followed the same way to create a server like i did then run this following command to check everything i have mentioned above.
$ cat /home/teamspeak/teamspeak3-server_linux_amd64/logs/ts3server_*
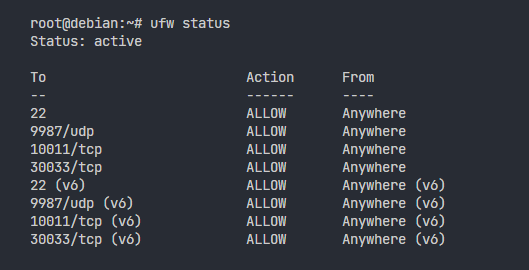
Step 8 — Configure Firewall
You can easily access the server on your local system (if you have created it on your local pc). If you try to connect to your Teamspeak Server from somewhere else, it doesn’t let you do it. That means your linux firewall is blocking the connection. You have to open Ports from Firewall to be able to connect to your server. Here are the ports with the type you have to enable:
- 9987 / UDP
- 10011 / TCP
- 30033 / TCP
If you are doing it in your Home Lab, to make your server public, you will have to do port forwarding. Otherwise for VPS, just keep doing as mentioned.
Install UFW (for debian based linux OS). UFW is called Uncomplicated Firewall.
$ apt-get install ufw
Now you have to enable ufw to be able to use it. By default it just installs but doesn’t work.
$ ufw enable
Now you have to allow ports with its type. Execute these commands one by one:
$ ufw allow 9987/udp
$ ufw allow 10011/tcp
$ ufw allow 30033/tcp
Check the status of your Ports in ufw using the following command:
$ ufw status
Step 9 — Connect To Teamspeak Server
Now we’ll connect to our Teamspeak Server. You will need your IP Address to be able to connect to the server. In my case, my server is on a Virtual Machine. I’ll copy the IP Address of my Linux on a virtual machine and use it as an ip address for the connection.
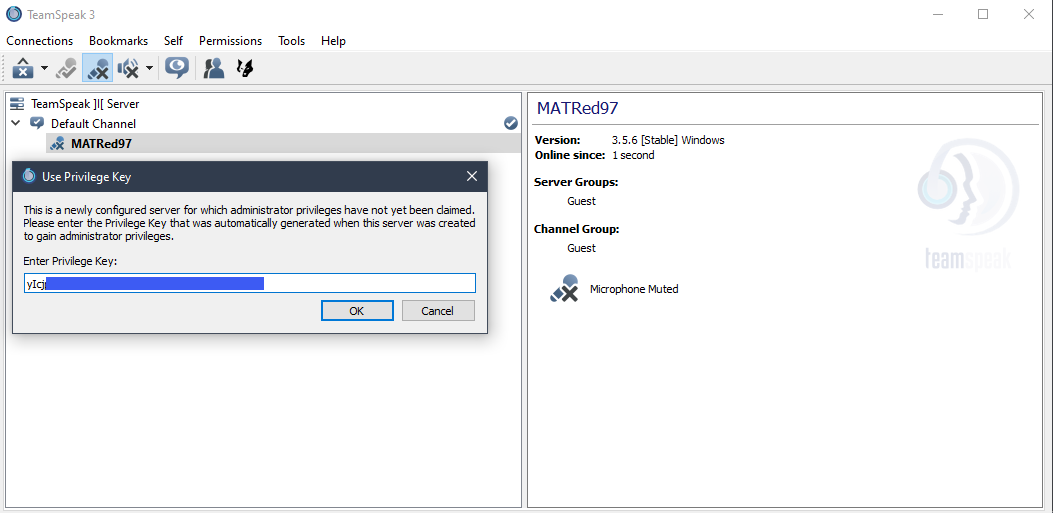
Must Log in Before you use your Token. As I have mentioned in the 9th point of prerequisites, if you use a token without login, you will be a guest admin. If you reinstall your OS, you will lose admin privilege. But if you have your token secured somewhere, you can use it again in the future to become an admin.
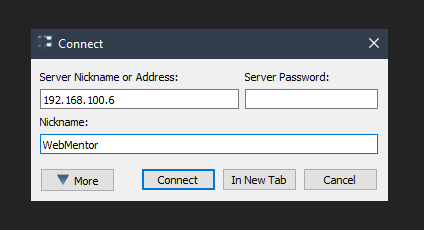
Now it will ask for your Privilege Key which is the Token you copied earlier during Step 7 . Put in that key as shown in the image.
 Now you will get this message if everything goes fine.
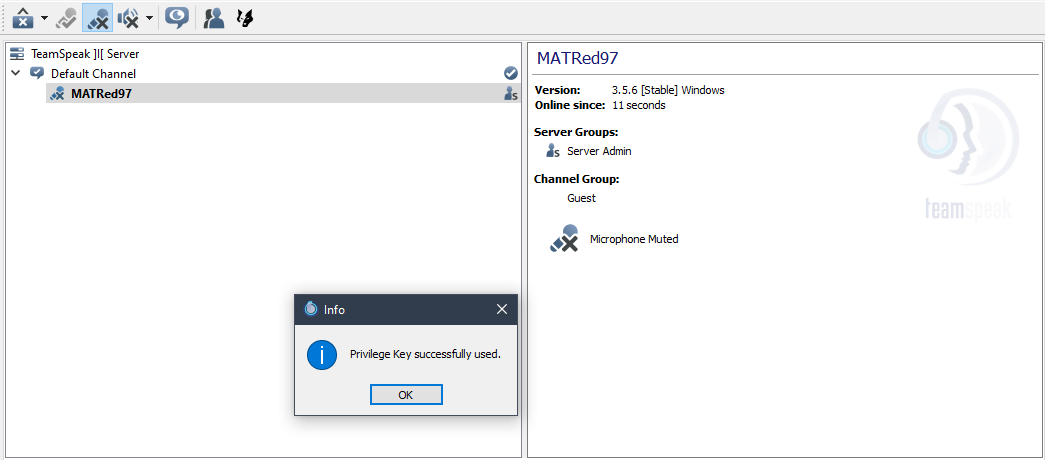 After using your privilege key, you will become a Server Admin. Your server will be available for the public to join anytime. You can set the password on the server from Teamspeak. No need to change anything in server files. Remember, by default, the server has only 32 slots for users. You can increase it by purchasing a license from the Teamspeak 3 Official Website. You will have to email them for a license. On their website, pricing is for a license with Hosting. In our case, we have hosting but not a license. That’s it. In case of any problem or information, simply contact us using the form or email us at contact@webmentordev.online