Linux System - Written by Ahmer Tahir
How To Setup Multiple Static IP Addresses On Linux Server

Introduction
In this tutorial you will learn How to set up multiple static ip addresses on the linux server. We are going to set it up on Debian 11 Server. The process can be different on other distros but the assigning of IPs can be the same. These multiple ips will be available on SSH so you can access it with any ip you create.
You can set up multiple static ips addresses on Linux Desktop distros, simply check out our blog on How To Setup Multiple Static IPS On Ubuntu 22.
Prerequisites:
Here is what you should Know before setting up IPs:
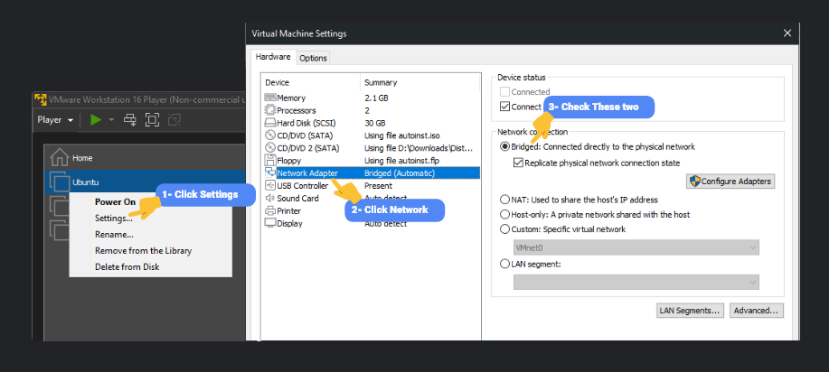
- For Virtual Machines, change Network Adaptor Setting to Bridged (Image Below)
- IPs will be assigned to the Network Adaptor/Interface.
- Physical servers or pcs does not need any Bridged setting change
- First IP address will be default IP
- Changes will be permanent. So restarting VM/PC/Server will not reset IPs
- You can use UFW for Firewall Setups with each
- Multiple Adaptors can be configured with IPs
- Static IPs can not be assigned to the Wireless Adaptor
- Only Assign Gateway and DNS Nameservers just once
Recommendations:
Here is some recommendations for static ips:
- Must configure firewall for protection
- You have to find network settings to be able to setup static ips
- You should know the Default Gateway
- DNS Nameservers can be your Router Login IP or Google or anything
- You can restrict SSH Access on single IP from UFW
- Multiple IPs works great with LAN Cache Server
Quick To Quick Setup?
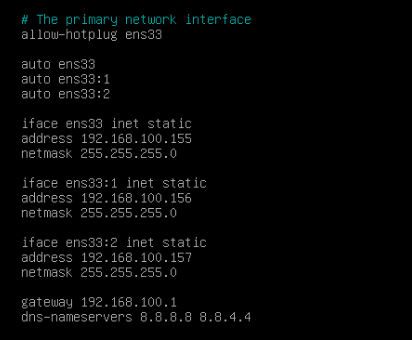
It is just as simple as editing the /etc/network/interfaces file. First we will assign a static ip address to our main Interface which is ens33 (your's can be different so use what will be available for you). To assign multiple ips we will divide our main Interface into sub interfaces like ens33:1 ens33:2 ens33:3 then we will assign ips to each of them.
To quick set it up, you can do something like then in this image
Step To Follow:
We will follow these steps to setup ips without any issue:
- Setup VM to Bridge (Optional)
- Setup Single Static IP Address
- Setup Multiple Interfaces
- Assign IP Address to Interfaces
- Restart Networking
- Test Internet Connection
Step 1 — Setup VM to Bridged
If you are using Virtual Machine then you have to set your VM’s networking to Bridged. Do this if you are using a Virtual Machine, a physical computer does not need it. If you don’t do it then your VM will not be able to Access the Internet or set Default Gateway.
What will happen to the VM with Bridged? It will make your VM available as a Physical Device to Port Forward. It will be like a PC connected to your Modem/Router like a real Physical Computer. That’s why it is important to Bridge your VM. In my case I'm using VMWare Workstation Player so here is how to bridge the connection.
Step 2 — Setup Single Static IP Address
First we need root account access to edit the /etc/network/interfaces file because it is a system file. If you have a sudo group on the server like with Ubuntu then type sudo before command or write it without sudo.
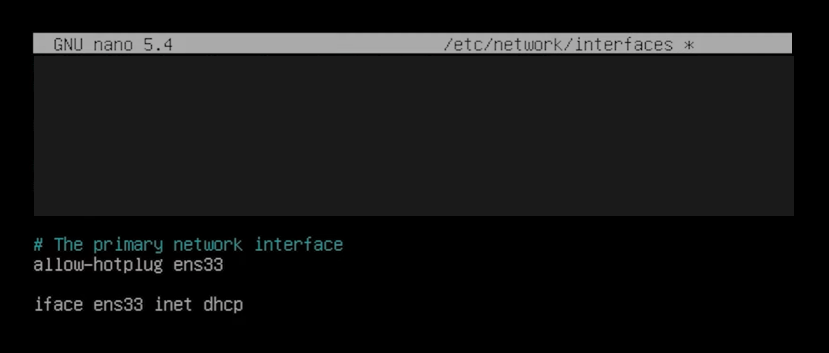
$ nano /etc/network/interfaces
This image is the default dhcp setting with your interface, my primary interface is ens33 that we will subdivide to assign ips. Your interface can be different so you will have to setup according to your interface configuration.
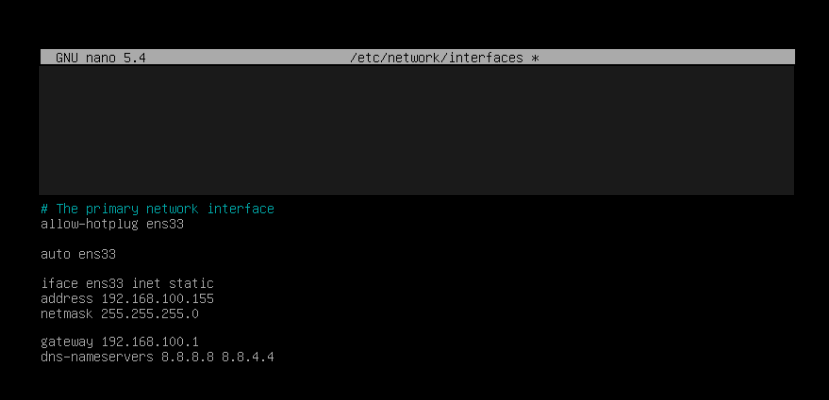
Now here we will make 6 changes to setup single static ip address:
- Add Interface with auto
- Change dhcp to static
- Assign address to interface
- Assign netmask 255.255.255.0
- Assign default gateway
- Assign dns-nameservers 8.8.8.8 8.8.4.4
auto ens33
 iface ens33 inet static
 address 192.168.100.155
 netmask 255.255.255.0
 gateway 192.168.100.1
 dns-nameserver 8.8.8.8 8.8.4.4
It should look something like this.
Step 3 — Setup Multiple Interfaces
In this step we will sub divide our primary interface, in my case it is ens33, into two more interfaces. We will assign ip addresses to these two which will add more static ips into our system.
My primary interface is auto ens33 we can extend by adding : then number repeatedly.
auto ens33
 auto ens33:1
 auto ens33:2
It should look like this in the file
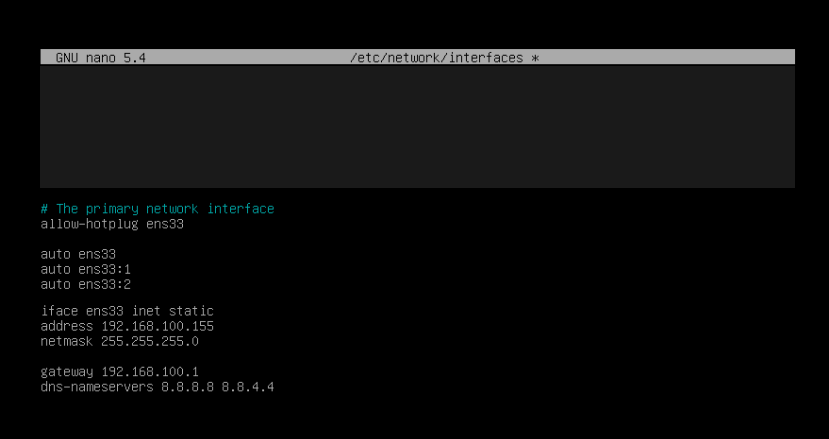
Step 4 — Assign IP Address to Interfaces
Now, as we have created two more interfaces ens33:1 ens33:2, we are going to assign ip address and netmask to each of them. Remember DNS-Name Servers and Gateway are just assigned once (do it at the end so it will be more clear).
Assign IP Address to each interface like this and also assign the same netmask to all of the ip addresses.
iface ens33:1 inet static
 address 192.168.100.156
 netmask 255.255.255.0
 iface ens33:2 inet static
 address 192.168.100.157
 netmask 255.255.255.0
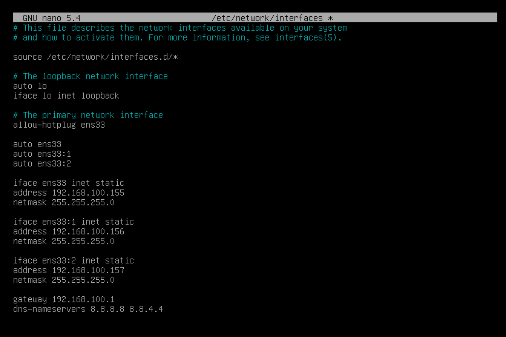
After successfully assigning ip addresses, file should look something like this
Step 5 — Restart Networking
For changes to take place, simply restart the Operating System or run the following command to restart the networking:
$ systemctl restart networking
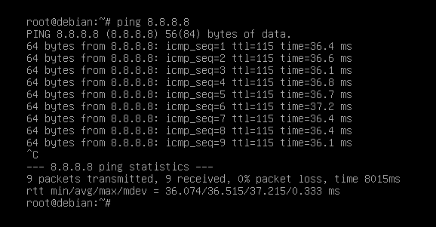
Step 6 — Test Connection
Now after setting it up, first we have to test whether our internet works or not. If you have done everything correctly then your ping will result in ping success and latency with ms will show up otherwise networking will be unreachable.